Contents
- 1 windows下载安装kubectl
- 2 Install and Set Up kubectl on Windows 在 Windows 上安装和设置 kubectl
- 3 在安装docker desktop的时候,勾选安装kubenetes
windows下载安装kubectl
- 方法一:Install and Set Up kubectl on Windows( kubernetes官网提供的下载安装kubectl的方法和步骤)
- 方法二:在安装docker desktop的时候,勾选安装kubenetes
两种方式,二选一即可
(注意,如果两种都安装了,注意生效的环境变量是哪个。)
which kubectlInstall and Set Up kubectl on Windows 在 Windows 上安装和设置 kubectl
Before you begin 开始之前
You must use a kubectl version that is within one minor version difference of your cluster. For example, a v1.27 client can communicate with v1.26, v1.27, and v1.28 control planes. Using the latest compatible version of kubectl helps avoid unforeseen issues. 您必须使用与您的集群有一个次要版本差异的 kubectl 版本。例如,v1.27 客户端可以与 v1.26、v1.27 和 v1.28 控制平面通信。使用最新兼容版本的 kubectl 有助于避免不可预见的问题。
Install kubectl on Windows 在 Windows 上安装 kubectl
The following methods exist for installing kubectl on Windows: 在 Windows 上安装 kubectl 有以下方法:
- Install kubectl binary with curl on Windows 在 Windows 上使用 curl 安装 kubectl 二进制文件
- Install on Windows using Chocolatey, Scoop, or winget 使用 Chocolatey、Scoop 或 winget 在 Windows 上安装
Install kubectl binary with curl on Windows 在 Windows 上使用 curl 安装 kubectl 二进制文件
-
Download the latest 1.27 patch release: kubectl 1.27.1. 下载最新的 1.27 补丁版本:kubectl 1.27.1。
Or if you have
curlinstalled, use this command: 或者,如果您安装了curl,请使用此命令:curl.exe -LO "https://dl.k8s.io/release/v1.27.1/bin/windows/amd64/kubectl.exe"Note: To find out the latest stable version (for example, for scripting), take a look at https://dl.k8s.io/release/stable.txt. 注意:要找出最新的稳定版本(例如,用于脚本),请查看 https://dl.k8s.io/release/stable.txt 。
-
Validate the binary (optional) 验证二进制文件(可选)
Download the
kubectlchecksum file: 下载kubectl校验和文件:curl.exe -LO "https://dl.k8s.io/v1.27.1/bin/windows/amd64/kubectl.exe.sha256"Validate the
kubectlbinary against the checksum file: 根据校验和文件验证kubectl二进制文件:-
Using Command Prompt to manually compare
CertUtil’s output to the checksum file downloaded: 使用命令提示符手动比较CertUtil的输出与下载的校验和文件:CertUtil -hashfile kubectl.exe SHA256 type kubectl.exe.sha256 -
Using PowerShell to automate the verification using the
-eqoperator to get aTrueorFalseresult: 使用 PowerShell 使用-eq运算符自动验证以获得True或False结果:$(Get-FileHash -Algorithm SHA256 .\kubectl.exe).Hash -eq $(Get-Content .\kubectl.exe.sha256)
-
-
Append or prepend the
kubectlbinary folder to yourPATHenvironment variable. 将kubectl二进制文件夹附加或添加到PATH环境变量中。 -
Test to ensure the version of
kubectlis the same as downloaded: 测试以确保kubectl的版本与下载的版本相同:kubectl version --clientNote:
The above command will generate a warning: 上面的命令会产生一个警告:
WARNING: This version information is deprecated and will be replaced with the output from kubectl version --short.You can ignore this warning. You are only checking the version of
kubectlthat you have installed. 您可以忽略此警告。您只检查已安装的kubectl的版本。Or use this for detailed view of version: 或者使用它来查看版本的详细信息:
kubectl version --client --output=yaml
Note: Docker Desktop for Windows adds its own version of kubectl to PATH. If you have installed Docker Desktop before, you may need to place your PATH entry before the one added by the Docker Desktop installer or remove the Docker Desktop’s kubectl. 注意:适用于 Windows 的 Docker Desktop 将自己的 kubectl 版本添加到 PATH 。如果您之前安装过 Docker Desktop,您可能需要将 PATH 条目放在 Docker Desktop 安装程序添加的条目之前,或者删除 Docker Desktop 的 kubectl 。
Install on Windows using Chocolatey, Scoop, or winget 使用 Chocolatey、Scoop 或 winget 在 Windows 上安装
-
To install kubectl on Windows you can use either Chocolatey package manager, Scoop command-line installer, or winget package manager. 要在 Windows 上安装 kubectl,您可以使用 Chocolatey 包管理器、Scoop 命令行安装程序或 winget 包管理器。
choco install kubernetes-cli -
Test to ensure the version you installed is up-to-date: 测试以确保您安装的版本是最新的:
kubectl version --client -
Navigate to your home directory: 导航到您的主目录:
# If you're using cmd.exe, run: cd %USERPROFILE% cd ~ -
Create the
.kubedirectory: 创建.kube目录:mkdir .kube -
Change to the
.kubedirectory you just created: 切换到刚刚创建的.kube目录:cd .kube -
Configure kubectl to use a remote Kubernetes cluster: 配置 kubectl 以使用远程 Kubernetes 集群:
New-Item config -type file
Note: Edit the config file with a text editor of your choice, such as Notepad. 注意:使用您选择的文本编辑器(例如记事本)编辑配置文件。
Verify kubectl configuration 验证 kubectl 配置
In order for kubectl to find and access a Kubernetes cluster, it needs a kubeconfig file, which is created automatically when you create a cluster using kube-up.sh or successfully deploy a Minikube cluster. By default, kubectl configuration is located at ~/.kube/config. 为了让 kubectl 找到并访问 Kubernetes 集群,它需要一个 kubeconfig 文件,当您使用 kube-up.sh 创建集群或成功部署 Minikube 集群时,它会自动创建。默认情况下,kubectl 配置位于 ~/.kube/config 。
Check that kubectl is properly configured by getting the cluster state: 通过获取集群状态检查 kubectl 是否正确配置:
kubectl cluster-infoIf you see a URL response, kubectl is correctly configured to access your cluster. 如果您看到 URL 响应,则 kubectl 已正确配置以访问您的集群。
If you see a message similar to the following, kubectl is not configured correctly or is not able to connect to a Kubernetes cluster. 如果您看到类似于以下内容的消息,则表示 kubectl 配置不正确或无法连接到 Kubernetes 集群。
The connection to the server <server-name:port> was refused - did you specify the right host or port?For example, if you are intending to run a Kubernetes cluster on your laptop (locally), you will need a tool like Minikube to be installed first and then re-run the commands stated above. 例如,如果您打算在笔记本电脑上(本地)运行 Kubernetes 集群,则需要先安装 Minikube 等工具,然后重新运行上述命令。
If kubectl cluster-info returns the url response but you can’t access your cluster, to check whether it is configured properly, use: 如果 kubectl cluster-info 返回 url 响应但您无法访问您的集群,请检查它是否配置正确,请使用:
kubectl cluster-info dumpOptional kubectl configurations and plugins 可选的 kubectl 配置和插件
Enable shell autocompletion 启用 shell 自动完成
kubectl provides autocompletion support for Bash, Zsh, Fish, and PowerShell, which can save you a lot of typing. kubectl 为 Bash、Zsh、Fish 和 PowerShell 提供了自动补全支持,可以让你节省大量的输入。
Below are the procedures to set up autocompletion for PowerShell. 以下是为 PowerShell 设置自动完成的过程。
The kubectl completion script for PowerShell can be generated with the command kubectl completion powershell. 可以使用命令 kubectl completion powershell 生成 PowerShell 的 kubectl 完成脚本。
To do so in all your shell sessions, add the following line to your $PROFILE file: 要在所有 shell 会话中执行此操作,请将以下行添加到您的 $PROFILE 文件中:
kubectl completion powershell | Out-String | Invoke-ExpressionThis command will regenerate the auto-completion script on every PowerShell start up. You can also add the generated script directly to your $PROFILE file. 此命令将在每次 PowerShell 启动时重新生成自动完成脚本。您还可以将生成的脚本直接添加到您的 $PROFILE 文件中。
To add the generated script to your $PROFILE file, run the following line in your powershell prompt: 要将生成的脚本添加到您的 $PROFILE 文件,请在您的 powershell 提示符下运行以下行:
kubectl completion powershell >> $PROFILEAfter reloading your shell, kubectl autocompletion should be working. 重新加载 shell 后,kubectl 自动完成功能应该可以正常工作了。
Install kubectl convert plugin
A plugin for Kubernetes command-line tool kubectl, which allows you to convert manifests between different API versions. This can be particularly helpful to migrate manifests to a non-deprecated api version with newer Kubernetes release. For more info, visit migrate to non deprecated apis Kubernetes 命令行工具 kubectl 的插件,允许您在不同 API 版本之间转换清单。这对于将清单迁移到具有更新的 Kubernetes 版本的未弃用的 api 版本特别有用。有关详细信息,请访问迁移到非弃用的 API
-
Download the latest release with the command: 使用以下命令下载最新版本:
curl.exe -LO "https://dl.k8s.io/release/v1.27.1/bin/windows/amd64/kubectl-convert.exe" -
Validate the binary (optional). 验证二进制文件(可选)。
Download the
kubectl-convertchecksum file: 下载kubectl-convert校验和文件:curl.exe -LO "https://dl.k8s.io/v1.27.1/bin/windows/amd64/kubectl-convert.exe.sha256"Validate the
kubectl-convertbinary against the checksum file: 根据校验和文件验证kubectl-convert二进制文件:-
Using Command Prompt to manually compare
CertUtil’s output to the checksum file downloaded: 使用命令提示符手动比较CertUtil的输出与下载的校验和文件:CertUtil -hashfile kubectl-convert.exe SHA256 type kubectl-convert.exe.sha256 -
Using PowerShell to automate the verification using the
-eqoperator to get aTrueorFalseresult: 使用 PowerShell 使用-eq运算符自动验证以获得True或False结果:$($(CertUtil -hashfile .\kubectl-convert.exe SHA256)[1] -replace " ", "") -eq $(type .\kubectl-convert.exe.sha256)
-
-
Append or prepend the
kubectl-convertbinary folder to yourPATHenvironment variable. 将kubectl-convert二进制文件夹附加或添加到PATH环境变量中。 -
Verify the plugin is successfully installed. 验证插件是否已成功安装。
kubectl convert --helpIf you do not see an error, it means the plugin is successfully installed. 如果您没有看到错误,则表示插件已成功安装。
-
After installing the plugin, clean up the installation files: 安装插件后,清理安装文件:
del kubectl-convert.exe kubectl-convert.exe.sha256
What’s next 接下来是什么
- Install Minikube
- See the getting started guides for more about creating clusters. 有关创建集群的更多信息,请参阅入门指南。
- Learn how to launch and expose your application. 了解如何启动和公开您的应用程序。
- If you need access to a cluster you didn’t create, see the Sharing Cluster Access document. 如果您需要访问不是您创建的集群,请参阅共享集群访问文档。
- Read the kubectl reference docs 阅读 kubectl 参考文档
在安装docker desktop的时候,勾选安装kubenetes
前面的章节是kubernetes官网提供的安装方法。
但是我按上面的方法执操作一遍,发现命令行kubectl版本与下载的版本不一致。
which kubectl发现是docker的安装路径下面。
原来,当时安装 docker desktop for windows的时候,docker desktop 已经帮忙安装了一套kubenetes。似乎可以直接用。
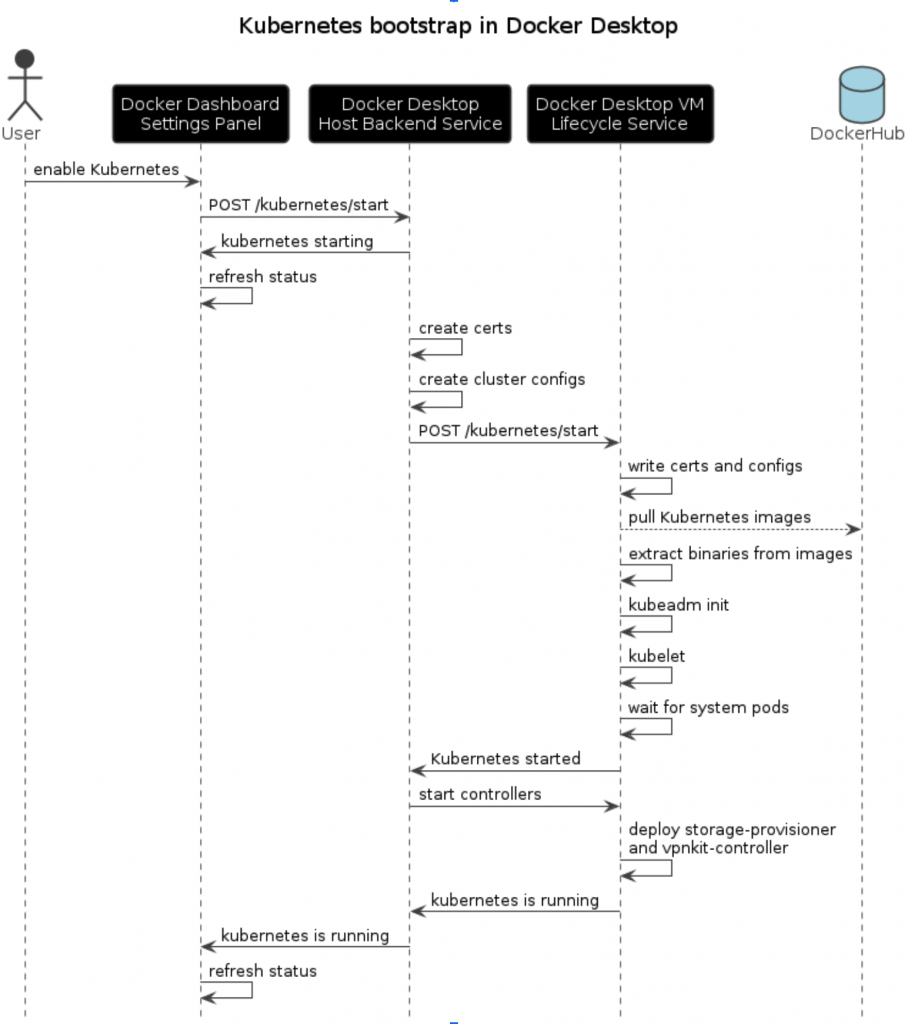
How Kubernetes works under the hood with Docker Desktop
发表回复