Contents
MySQL安装
参考: https://dev.mysql.com/doc/mysql-operator/en/mysql-operator-introduction.html
参考: https://cloud.tencent.com/developer/article/1858917
介绍与选型
MySQL5.7之前主要还是基于binlog的主从复制实现的读写分离。主从之前可能有延迟。高可用也是通过另外配置MHA脚本或keepalived实现的,节点异常但是ip没释放等情况下可能有问题。多主的实现也不大靠谱。
MySQL5.7及之后版本,新增了组复制。允许多主多从,实际上是基于多数共识协议,当有写请求到来时,在某个节点上得到多数认同即可写,相关节点与之同步。相比直接的主从模式,响应会略慢一些。但是提升了故障转移能力。
但是,由于shared nothing以及全局事务的需求,mysql比较适用于OLTP业务(相比OLAP),难于应对千万级、亿级以上大表的join。
实际上,对于分布式、大数据量、k8s以及云原生环境下,使用分布式的云原生数据库可能更好,比如与mysql基本兼容的TiDB(存储计算分离,HTAP)。
参考: https://dev.mysql.com/doc/mysql-operator/en/mysql-operator-introduction.html
mysql官方提供了Cluster以及方便管理集群的Operator。可以直接建cluster,也可以试用Operator 创建和管理。
- MySQL Operator for Kubernetes, https://artifacthub.io/packages/helm/mysql-operator/mysql-operator
- MySQL InnoDB Cluster(需要先安装前面的Operator), https://artifacthub.io/packages/helm/mysql-operator/mysql-innodbcluster
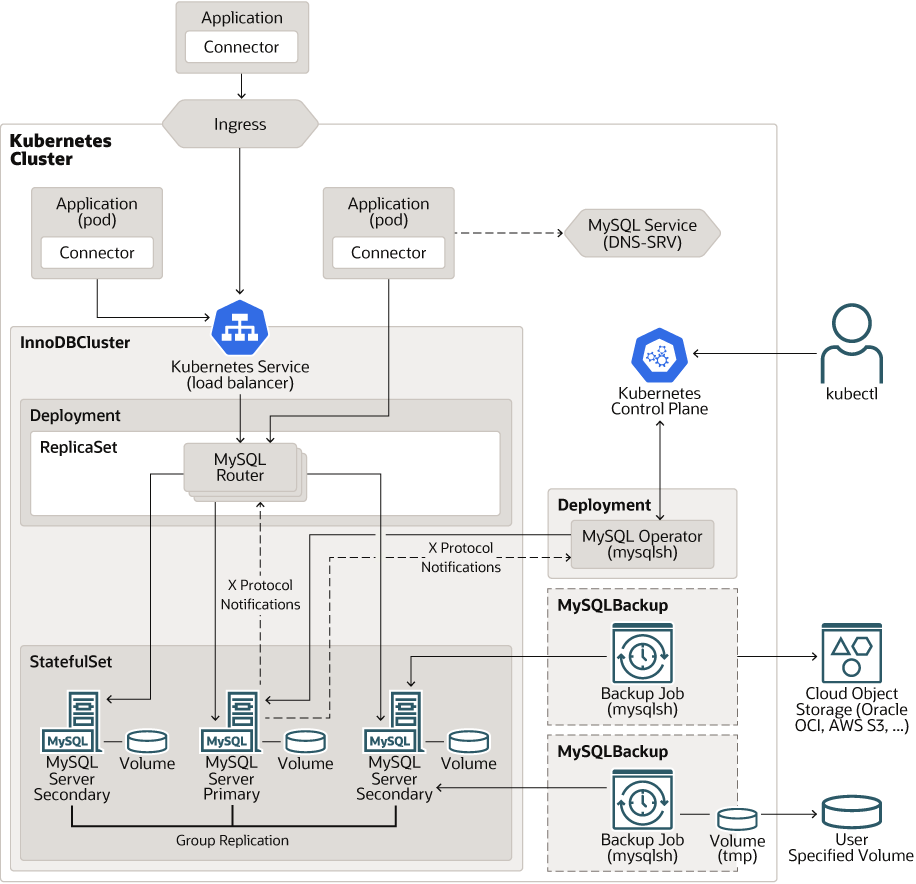
mysql官方提供的k8s中mysql集群架构
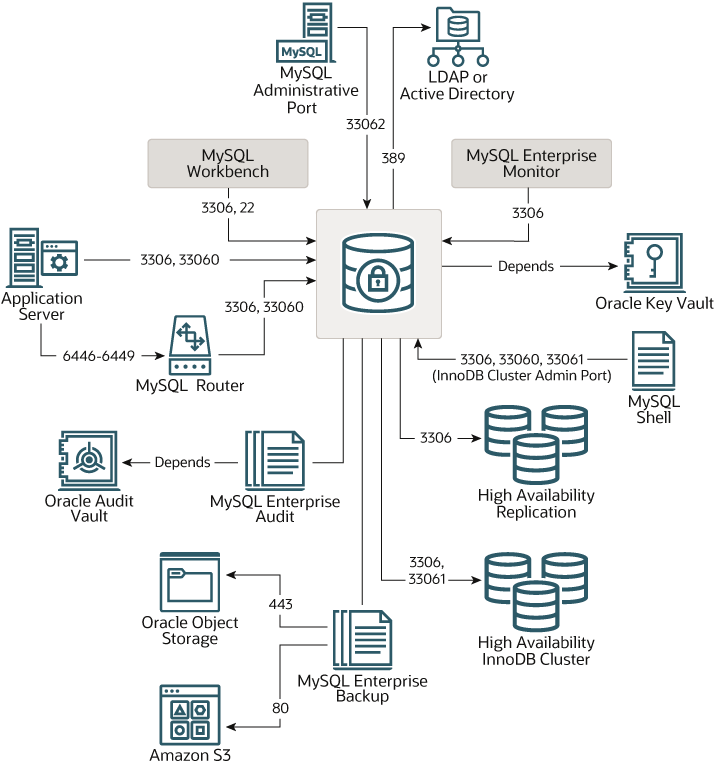
官网提供的默认MySQL Port Diagram
参考: https://dev.mysql.com/doc/mysql-port-reference/en/mysql-port-diagram.html
参考: https://dev.mysql.com/doc/mysql-port-reference/en/mysql-port-reference-tables.html
部署安装
部署安装官方mysql cluster
参考: https://dev.mysql.com/doc/mysql-operator/en/mysql-operator-installation.html
参考: https://dev.mysql.com/doc/mysql-operator/en/mysql-operator-installation-helm.html
参考: https://artifacthub.io/packages/helm/mysql-operator/mysql-operator
添加仓库
helm repo add mysql-operator https://mysql.github.io/mysql-operator/
helm repo update
安装MySQL Operator
部署安装Operator
[root@jingmin-kube-archlinux k8s]# helm install mysql-operator mysql-operator/mysql-operator --namespace mysql-operator --create-namespace
NAME: mysql-operator
LAST DEPLOYED: Mon Sep 11 17:06:52 2023
NAMESPACE: mysql-operator
STATUS: deployed
REVISION: 1
TEST SUITE: None
NOTES:
Create an MySQL InnoDB Cluster by executing:
1. When using a source distribution / git clone: `helm install [cluster-name] -n [ns-name] ~/helm/mysql-innodbcluster`
2. When using the Helm repo from ArtifactHub
2.1 With self signed certificates
    export NAMESPACE="your-namespace"
    # in case the namespace doesn't exist, please pass --create-namespace
    helm install my-mysql-innodbcluster mysql-operator/mysql-innodbcluster -n $NAMESPACE \
        --version 2.1.0 \
        --set credentials.root.password=">-0URS4F3P4SS" \
        --set tls.useSelfSigned=true

2.2 When you have own CA and TLS certificates
        export NAMESPACE="your-namespace"
        export CLUSTER_NAME="my-mysql-innodbcluster"
        export CA_SECRET="$CLUSTER_NAME-ca-secret"
        export TLS_SECRET="$CLUSTER_NAME-tls-secret"
        export ROUTER_TLS_SECRET="$CLUSTER_NAME-router-tls-secret"
        # Path to ca.pem, server-cert.pem, server-key.pem, router-cert.pem and router-key.pem
        export CERT_PATH="/path/to/your/ca_and_tls_certificates"

        kubectl create namespace $NAMESPACE

        kubectl create secret generic $CA_SECRET \
            --namespace=$NAMESPACE --dry-run=client --save-config -o yaml \
            --from-file=ca.pem=$CERT_PATH/ca.pem \
        | kubectl apply -f -

        kubectl create secret tls $TLS_SECRET \
            --namespace=$NAMESPACE --dry-run=client --save-config -o yaml \
            --cert=$CERT_PATH/server-cert.pem --key=$CERT_PATH/server-key.pem \
        | kubectl apply -f -

        kubectl create secret tls $ROUTER_TLS_SECRET \
            --namespace=$NAMESPACE --dry-run=client --save-config -o yaml \
            --cert=$CERT_PATH/router-cert.pem --key=$CERT_PATH/router-key.pem \
        | kubectl apply -f -

        helm install my-mysql-innodbcluster mysql-operator/mysql-innodbcluster -n $NAMESPACE \
        --version 2.1.0 \
        --set credentials.root.password=">-0URS4F3P4SS" \
        --set tls.useSelfSigned=false \
        --set tls.caSecretName=$CA_SECRET \
        --set tls.serverCertAndPKsecretName=$TLS_SECRET \
        --set tls.routerCertAndPKsecretName=$ROUTER_TLS_SECRET
上面给了一些部署innodb cluster的说明。
安装MySQL InnoDB Cluster实例
可以参考上面安装好Operator的说明,以及如下官网及artifacthub的说明:
参考: https://dev.mysql.com/doc/mysql-operator/en/mysql-operator-innodbcluster-simple-helm.html
参考: https://artifacthub.io/packages/helm/mysql-operator/mysql-innodbcluster
helm install mysql-cluster mysql-operator/mysql-innodbcluster \
        --namespace mysql-cluster \
        --create-namespace \
        --set credentials.root.user='root' \
        --set credentials.root.password='Mysql12345' \
        --set credentials.root.host='%' \
        --set serverInstances=3 \
        --set routerInstances=1 \
        --set tls.useSelfSigned=true
将相应命名空间设为当前默认命名空间, 查看相关资源
卸载
[root@jingmin-kube-archlinux ~]helm uninstall mysql-innodbcluster
[root@jingmin-kube-archlinux ~]# kubectl delete innodbclusters.mysql.oracle.com mysql-innodbcluster
但是发现并没有删除集群,好像是有finalizar,防止误删的原因。
参考: https://github.com/bitpoke/mysql-operator/issues/349
编辑相应的资源,删除finalizar相关的annotations.
最后发现是因为之前集群主节点内存不足,有过hang住的情况,mysql-operator坏掉了。重装了一遍Operator。
安装bitnami的版本
参考: https://artifacthub.io/packages/helm/bitnami/mysql
新建命名空间,设为当前默认命名空间
create ns mysql
config set-context --current --namespace mysql
下载chart,看下
helm pull oci://registry-1.docker.io/bitnamicharts/mysql --untar
cd mysql/
复制默认的values.yaml文件,编辑和保留副本中需要调整的配置
[root@jingmin-kube-archlinux mysql]# cp values.yaml my-override-values.yaml
[root@jingmin-kube-archlinux mysql]# vim my-override-values.yaml
[root@jingmin-kube-archlinux mysql]# cat my-override-values.yaml
## @section Global parameters
## Global Docker image parameters
## Please, note that this will override the image parameters, including dependencies, configured to use the global value
## Current available global Docker image parameters: imageRegistry, imagePullSecrets and storageClass
##
global:
  storageClass: ""


## @section MySQL common parameters
##

## @param architecture MySQL architecture (`standalone` or `replication`)
##
architecture: replication
## MySQL Authentication parameters
##
auth:
  ## @param auth.rootPassword Password for the `root` user. Ignored if existing secret is provided
  ## ref: https://github.com/bitnami/containers/tree/main/bitnami/mysql#setting-the-root-password-on-first-run
  ##
  rootPassword: "Mysql12345"
  ## @param auth.createDatabase Whether to create the .Values.auth.database or not
  ## ref: https://github.com/bitnami/containers/tree/main/bitnami/mysql#creating-a-database-on-first-run
  ##
  createDatabase: true
  ## @param auth.database Name for a custom database to create
  ## ref: https://github.com/bitnami/containers/tree/main/bitnami/mysql#creating-a-database-on-first-run
  ##
  database: "my_database"
  ## @param auth.username Name for a custom user to create
  ## ref: https://github.com/bitnami/containers/tree/main/bitnami/mysql#creating-a-database-user-on-first-run
  ##
  username: "test"
  ## @param auth.password Password for the new user. Ignored if existing secret is provided
  ##
  password: "Test12345"
  ## @param auth.replicationUser MySQL replication user
  ## ref: https://github.com/bitnami/containers/tree/main/bitnami/mysql#setting-up-a-replication-cluster
  ##
  replicationUser: replicator
  ## @param auth.replicationPassword MySQL replication user password. Ignored if existing secret is provided
  ##
  replicationPassword: ""

## @section MySQL Primary parameters
##

primary:
  ## @param primary.name Name of the primary database (eg primary, master, leader, ...)
  ##
  name: primary
  ## @param primary.command Override default container command on MySQL Primary container(s) (useful when using custom images)
  ##
  command: []
  ## @param primary.args Override default container args on MySQL Primary container(s) (useful when using custom images)
  ##
  args: []
  ## @param primary.lifecycleHooks for the MySQL Primary container(s) to automate configuration before or after startup
  ##
  lifecycleHooks: {}
  ## @param primary.hostAliases Deployment pod host aliases
  ## https://kubernetes.io/docs/concepts/services-networking/add-entries-to-pod-etc-hosts-with-host-aliases/
  ##
  hostAliases: []
  ## @param primary.configuration [string] Configure MySQL Primary with a custom my.cnf file
  ## ref: https://mysql.com/kb/en/mysql/configuring-mysql-with-mycnf/#example-of-configuration-file
  ##
  configuration: |-
    [mysqld]
    default_authentication_plugin=mysql_native_password
    skip-name-resolve
    explicit_defaults_for_timestamp
    basedir=/opt/bitnami/mysql
    plugin_dir=/opt/bitnami/mysql/lib/plugin
    port=3306
    socket=/opt/bitnami/mysql/tmp/mysql.sock
    datadir=/bitnami/mysql/data
    tmpdir=/opt/bitnami/mysql/tmp
    max_allowed_packet=16M
    bind-address=*
    pid-file=/opt/bitnami/mysql/tmp/mysqld.pid
    log-error=/opt/bitnami/mysql/logs/mysqld.log
    character-set-server=UTF8
    collation-server=utf8_general_ci
    slow_query_log=0
    long_query_time=10.0

    [client]
    port=3306
    socket=/opt/bitnami/mysql/tmp/mysql.sock
    default-character-set=UTF8
    plugin_dir=/opt/bitnami/mysql/lib/plugin

    [manager]
    port=3306
    socket=/opt/bitnami/mysql/tmp/mysql.sock
    pid-file=/opt/bitnami/mysql/tmp/mysqld.pid
  ## @param primary.affinity Affinity for MySQL primary pods assignment
  ## ref: https://kubernetes.io/docs/concepts/configuration/assign-pod-node/#affinity-and-anti-affinity
  ## Note: podAffinityPreset, podAntiAffinityPreset, and  nodeAffinityPreset will be ignored when it's set
  ##
  affinity: {}
  ## @param primary.nodeSelector Node labels for MySQL primary pods assignment
  ## ref: https://kubernetes.io/docs/user-guide/node-selection/
  ##
  nodeSelector: {}
  ## @param primary.tolerations Tolerations for MySQL primary pods assignment
  ## ref: https://kubernetes.io/docs/concepts/configuration/taint-and-toleration/
  ##
  tolerations: []
  ## Enable persistence using Persistent Volume Claims
  ## ref: https://kubernetes.io/docs/user-guide/persistent-volumes/
  ##
  persistence:
    ## @param primary.persistence.enabled Enable persistence on MySQL primary replicas using a `PersistentVolumeClaim`. If false, use emptyDir
    ##
    enabled: true
    ## @param primary.persistence.subPath The name of a volume's sub path to mount for persistence
    ##
    subPath: ""
    ## @param primary.persistence.storageClass MySQL primary persistent volume storage Class
    ## If defined, storageClassName: <storageClass>
    ## If set to "-", storageClassName: "", which disables dynamic provisioning
    ## If undefined (the default) or set to null, no storageClassName spec is
    ##   set, choosing the default provisioner.  (gp2 on AWS, standard on
    ##   GKE, AWS & OpenStack)
    ##
    storageClass: ""
  ## MySQL Primary Service parameters
  ##
  service:
    ## @param primary.service.type MySQL Primary K8s service type
    ##
    type: ClusterIP
    ## @param primary.service.ports.mysql MySQL Primary K8s service port
    ##
    ports:
      mysql: 3306
    ## @param primary.service.nodePorts.mysql MySQL Primary K8s service node port
    ## ref: https://kubernetes.io/docs/concepts/services-networking/service/#type-nodeport
    ##
    nodePorts:
      mysql: ""


## @section MySQL Secondary parameters
##

secondary:
  ## @param secondary.name Name of the secondary database (eg secondary, slave, ...)
  ##
  name: secondary
  ## @param secondary.replicaCount Number of MySQL secondary replicas
  ##
  replicaCount: 1
  ## @param secondary.configuration [string] Configure MySQL Secondary with a custom my.cnf file
  ## ref: https://mysql.com/kb/en/mysql/configuring-mysql-with-mycnf/#example-of-configuration-file
  ##
  configuration: |-
    [mysqld]
    default_authentication_plugin=mysql_native_password
    skip-name-resolve
    explicit_defaults_for_timestamp
    basedir=/opt/bitnami/mysql
    plugin_dir=/opt/bitnami/mysql/lib/plugin
    port=3306
    socket=/opt/bitnami/mysql/tmp/mysql.sock
    datadir=/bitnami/mysql/data
    tmpdir=/opt/bitnami/mysql/tmp
    max_allowed_packet=16M
    bind-address=*
    pid-file=/opt/bitnami/mysql/tmp/mysqld.pid
    log-error=/opt/bitnami/mysql/logs/mysqld.log
    character-set-server=UTF8
    collation-server=utf8_general_ci
    slow_query_log=0
    long_query_time=10.0

    [client]
    port=3306
    socket=/opt/bitnami/mysql/tmp/mysql.sock
    default-character-set=UTF8
    plugin_dir=/opt/bitnami/mysql/lib/plugin

    [manager]
    port=3306
    socket=/opt/bitnami/mysql/tmp/mysql.sock
    pid-file=/opt/bitnami/mysql/tmp/mysqld.pid
  ## @param secondary.affinity Affinity for MySQL secondary pods assignment
  ## ref: https://kubernetes.io/docs/concepts/configuration/assign-pod-node/#affinity-and-anti-affinity
  ## Note: podAffinityPreset, podAntiAffinityPreset, and  nodeAffinityPreset will be ignored when it's set
  ##
  affinity: {}
  ## @param secondary.nodeSelector Node labels for MySQL secondary pods assignment
  ## ref: https://kubernetes.io/docs/user-guide/node-selection/
  ##
  nodeSelector: {}
  ## @param secondary.tolerations Tolerations for MySQL secondary pods assignment
  ## ref: https://kubernetes.io/docs/concepts/configuration/taint-and-toleration/
  ##
  tolerations: []
  ## Enable persistence using Persistent Volume Claims
  ## ref: https://kubernetes.io/docs/user-guide/persistent-volumes/
  ##
  persistence:
    ## @param secondary.persistence.enabled Enable persistence on MySQL secondary replicas using a `PersistentVolumeClaim`
    ##
    enabled: true
    ## @param secondary.persistence.subPath The name of a volume's sub path to mount for persistence
    ##
    subPath: ""
    ## @param secondary.persistence.storageClass MySQL secondary persistent volume storage Class
    ## If defined, storageClassName: <storageClass>
    ## If set to "-", storageClassName: "", which disables dynamic provisioning
    ## If undefined (the default) or set to null, no storageClassName spec is
    ##   set, choosing the default provisioner.  (gp2 on AWS, standard on
    ##   GKE, AWS & OpenStack)
    ##
    storageClass: ""
  ## MySQL Secondary Service parameters
  ##
  service:
    ## @param secondary.service.type MySQL secondary Kubernetes service type
    ##
    type: ClusterIP
    ## @param secondary.service.ports.mysql MySQL secondary Kubernetes service port
    ##
    ports:
      mysql: 3306
    ## @param secondary.service.nodePorts.mysql MySQL secondary Kubernetes service node port
    ## ref: https://kubernetes.io/docs/concepts/services-networking/service/#type-nodeport
    ##
    nodePorts:
      mysql: ""
实际上这里只调整了下默认的mysql密码,
以及架构从standalone改为replication。主从复制。
其他基本没变,保留了一些看起来比较重要的配置。
部署安装
[root@jingmin-kube-archlinux mysql]# cd ..
[root@jingmin-kube-archlinux ~]# helm install mysql -f ./mysql/my-override-values.yaml ./mysql/
NAME: mysql
LAST DEPLOYED: Tue Sep 12 09:02:07 2023
NAMESPACE: mysql
STATUS: deployed
REVISION: 1
TEST SUITE: None
NOTES:
CHART NAME: mysql
CHART VERSION: 9.12.2
APP VERSION: 8.0.34

** Please be patient while the chart is being deployed **

Tip:

  Watch the deployment status using the command: kubectl get pods -w --namespace mysql

Services:

  echo Primary: mysql-primary.mysql.svc.cluster.local:3306
  echo Secondary: mysql-secondary.mysql.svc.cluster.local:3306

Execute the following to get the administrator credentials:

  echo Username: root
  MYSQL_ROOT_PASSWORD=$(kubectl get secret --namespace mysql mysql -o jsonpath="{.data.mysql-root-password}" | base64 -d)

To connect to your database:

  1. Run a pod that you can use as a client:

      kubectl run mysql-client --rm --tty -i --restart='Never' --image  docker.io/bitnami/mysql:8.0.34-debian-11-r31 --namespace mysql --env MYSQL_ROOT_PASSWORD=$MYSQL_ROOT_PASSWORD --command -- bash

  2. To connect to primary service (read/write):

      mysql -h mysql-primary.mysql.svc.cluster.local -uroot -p"$MYSQL_ROOT_PASSWORD"

  3. To connect to secondary service (read-only):

      mysql -h mysql-secondary.mysql.svc.cluster.local -uroot -p"$MYSQL_ROOT_PASSWORD"
这里提示了一些查看root密码和集群内连接mysql的tips。
看下相关资源有没有都起来
[root@jingmin-kube-archlinux ~]# kubectl get all
NAME                    READY   STATUS    RESTARTS   AGE
pod/mysql-primary-0     1/1     Running   0          5m52s
pod/mysql-secondary-0   1/1     Running   0          5m52s

NAME                               TYPE        CLUSTER-IP     EXTERNAL-IP   PORT(S)    AGE
service/mysql-primary              ClusterIP   172.31.8.129   <none>        3306/TCP   5m53s
service/mysql-primary-headless     ClusterIP   None           <none>        3306/TCP   5m53s
service/mysql-secondary            ClusterIP   172.31.5.11    <none>        3306/TCP   5m53s
service/mysql-secondary-headless   ClusterIP   None           <none>        3306/TCP   5m53s

NAME                               READY   AGE
statefulset.apps/mysql-primary     1/1     5m52s
statefulset.apps/mysql-secondary   1/1     5m52s
看下密码
[root@jingmin-kube-archlinux ~]# MYSQL_ROOT_PASSWORD=$(kubectl get secret --namespace mysql mysql -o jsonpath="{.data.mysql-root-password}" | base64 -d)
[root@jingmin-kube-archlinux ~]# echo $MYSQL_ROOT_PASSWORD
Mysql12345
集群内临时加个mysql-client的pod,试下连接
[root@jingmin-kube-archlinux ~]# kubectl run mysql-client --rm --tty -i --restart='Never' --image  docker.io/bitnami/mysql:8.0.34-debian-11-r31 --namespace mysql --env MYSQL_ROOT_PASSWORD=$MYSQL_ROOT_PASSWORD --command -- bashIf you don't see a command prompt, try pressing enter.
I have no name!@mysql-client:/$ mysql -h mysql-primary.mysql.svc.cluster.local -uroot -p"$MYSQL_ROOT_PASSWORD"
mysql: [Warning] Using a password on the command line interface can be insecure.
Welcome to the MySQL monitor.  Commands end with ; or \g.
Your MySQL connection id is 50
Server version: 8.0.34 Source distribution

Copyright (c) 2000, 2023, Oracle and/or its affiliates.

Oracle is a registered trademark of Oracle Corporation and/or its
affiliates. Other names may be trademarks of their respective
owners.

Type 'help;' or '\h' for help. Type '\c' to clear the current input statement.

mysql> show databases;
+--------------------+
| Database           |
+--------------------+
| information_schema |
| my_database        |
| mysql              |
| performance_schema |
| sys                |
+--------------------+
5 rows in set (0.01 sec)

mysql> exit
Bye
I have no name!@mysql-client:/$ mysql -h mysql-secondary.mysql.svc.cluster.local -uroot -p"$MYSQL_ROOT_PASSWORD"
mysql: [Warning] Using a password on the command line interface can be insecure.
Welcome to the MySQL monitor.  Commands end with ; or \g.
Your MySQL connection id is 54
Server version: 8.0.34 Source distribution

Copyright (c) 2000, 2023, Oracle and/or its affiliates.

Oracle is a registered trademark of Oracle Corporation and/or its
affiliates. Other names may be trademarks of their respective
owners.

Type 'help;' or '\h' for help. Type '\c' to clear the current input statement.

mysql> show databases;
+--------------------+
| Database           |
+--------------------+
| information_schema |
| my_database        |
| mysql              |
| performance_schema |
| sys                |
+--------------------+
5 rows in set (0.00 sec)

mysql> exit
Bye
I have no name!@mysql-client:/$ exit
exit
pod "mysql-client" deleted
TiDB部署安装
暂未尝试,略
发表回复