Harbor安装
参考: https://github.com/moooofly/MarkSomethingDownLLS/blob/master/Harbor%20%E4%B9%8B%20Notary%20%E5%92%8C%20Clair.md
参考: https://docs.docker.com/engine/security/trust/
参考: https://www.redhat.com/en/topics/containers/what-is-clair
私有仓库选型
最基本的是Docker官方提供的registry镜像。但是没有UI和其他辅助功能。
VMWare开源的Harbor。
Redhat开源的Quay。
参考: https://supereagle.github.io/2019/11/23/harbor-vs-quay/
目前准备使用Harbor
Harbor组件
参考: https://goharbor.io/docs/2.8.0/install-config/#harbor-components
The table below lists the some of the key components that are deployed when you deploy Harbor. 下表列出了部署 Harbor 时部署的一些关键组件。
| Component 成分 | Version 版本 |
|---|---|
| Postgresql PostgreSQL | 13.3.0 |
| Redis | 6.0.13 |
| Beego | 1.9.0 |
| Docker/distribution | 2.7.1 |
| Docker/notary | 0.6.1 |
| Helm 舵 | 2.9.1 |
| Swagger-ui | 3.22.1 |
应用概念
参考: https://github.com/moooofly/MarkSomethingDownLLS/blob/master/Harbor%20%E4%B9%8B%20Notary%20%E5%92%8C%20Clair.md
目前使用Harbor,但是看到Harbor中还有涉及Notary等的配置。所以这里先了解下相关概念。
Clair和Trivy
Clair主要提供漏洞扫描功能。Trivy也是同样的功能。从后面下载的helm配置文件来看,Harbor目前用的是Trivy。
参考: https://www.redhat.com/en/topics/containers/what-is-clair
参考: https://blog.devops.dev/trivy-an-overview-benefits-over-clair-and-usage-examples-97ee254ed2d3
Clair scans each container layer and provides a notification of vulnerabilities that may be a threat, based on the Common Vulnerabilities and Exposures database (CVE) and similar databases from Red Hat ®, Ubuntu, and Debian. Since layers can be shared between many containers, introspection is vital to build an inventory of packages and match that against known CVEs. Clair 扫描每个容器层,并根据常见漏洞和暴露数据库 (CVE) 以及 Red Hat®、Ubuntu 和 Debian 的类似数据库,提供可能构成威胁的漏洞通知。由于层可以在许多容器之间共享,因此内省对于构建包清单并将其与已知的 CVE 进行匹配至关重要。
Notary
Notary主要提供镜像签名功能。
参考: https://docs.docker.com/engine/security/trust/
参考: https://github.com/notaryproject/notary
参考: https://theupdateframework.github.io/specification/latest/
Notary是一个TUF的实现,
参考:https://github.com/notaryproject/notary
来自Notary存储仓库的说明:
This repository provides an implementation of The Update Framework specification and all references to
notaryin this repository refer to the implementation of the client and server aligning with the TUF specification. The most prominent use of this implementation is in Docker Content Trust (DCT). The first release v0.1 was released in November, 2015. 此存储库提供了更新框架规范的实现,并且此存储库中对notary的所有引用均指与 TUF 规范一致的客户端和服务器的实现。此实现最突出的用途是 Docker Content Trust (DCT)。第一个版本 v0.1 于 2015 年 11 月发布。
关于TUF (The Update Framework specification)
参考: https://theupdateframework.github.io/specification/latest/#system-overview
关于DCT(Docker Content Trust)
参考: https://docs.docker.com/engine/security/trust/

Harbor Core
Harbor core提供与 Docker registry 一致的镜像仓库功能(都符合OCI标准)。
官网安装说明
(k8s环境下使用helm安装)
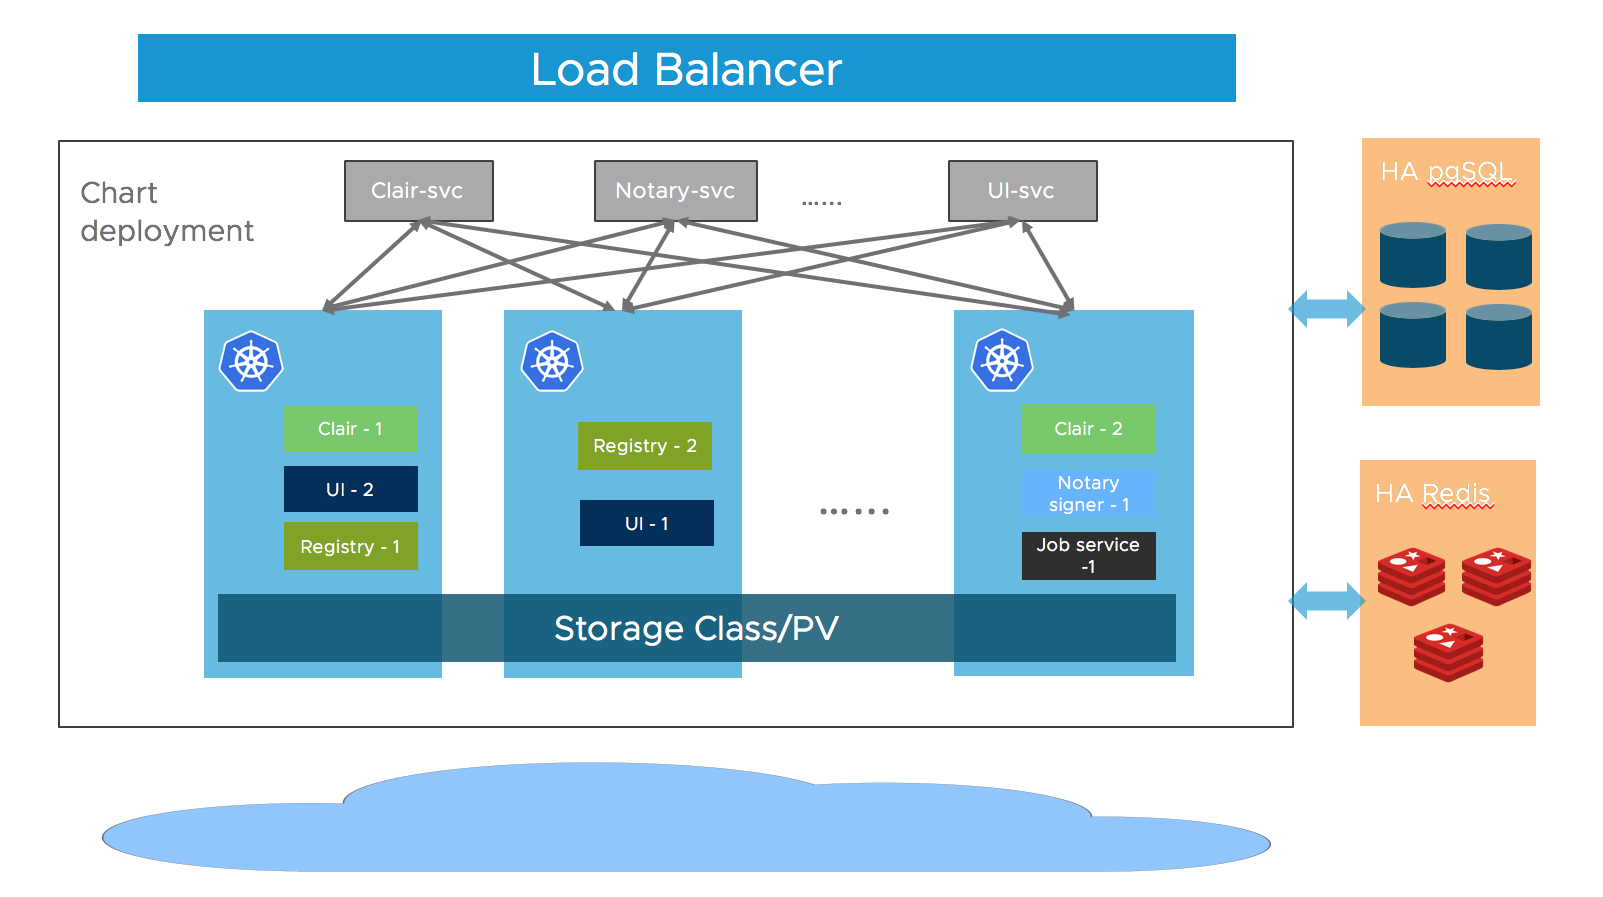
转载来源: https://goharbor.io/docs/2.8.0/install-config/harbor-ha-helm/
You can deploy Harbor on Kubernetes via helm to make it highly available. In this way, if one of the nodes on which Harbor is running becomes unavailable, users do not experience interruptions of service.
Prerequisites
- Kubernetes cluster 1.10+
- Helm 2.8.0+
- High available ingress controller (Harbor does not manage the external endpoint)
- High available PostgreSQL 9.6+ (Harbor does not handle the deployment of HA of database)
- High available Redis (Harbor does not handle the deployment of HA of Redis)
- PVC that can be shared across nodes or external object storage
Architecture
Most of Harbor’s components are stateless now. So we can simply increase the replica of the pods to make sure the components are distributed to multiple worker nodes, and leverage the “Service” mechanism of K8S to ensure the connectivity across pods.
As for storage layer, it is expected that the user provide high available PostgreSQL, Redis cluster for application data and PVCs or object storage for storing images and charts.
Download Chart
Download Harbor helm chart:
helm repo add harbor https://helm.goharbor.io
helm fetch harbor/harbor --untar
Configuration
Configure the followings items in values.yaml, you can also set them as parameters via --set flag during running helm install:
-
Ingress rule Configure the
expose.ingress.hosts.coreandexpose.ingress.hosts.notary. -
External URL Configure the
externalURL. -
External PostgreSQL Set the
database.typetoexternaland fill the information indatabase.externalsection.Three empty databases should be created manually for
Harbor core,Notary serverandNotary signerand configure them in the section. Harbor will create tables automatically when starting up. -
External Redis Set the
redis.typetoexternaland fill the information inredis.externalsection.Harbor introduced redis
Sentinelmode support in 2.1.0. You can enable this by settingsentinel_master_setandhostto<host_sentinel1>:<port_sentinel1>,<host_sentinel2>:<port_sentinel2>,<host_sentinel3>:<port_sentinel3>.You can also refer to this guide to setup a HAProxy before the Redis to expose a single entry point.
-
Storage By default, a default
StorageClassis needed in the K8S cluster to provision volumes to store images, charts and job logs.If you want to specify the
StorageClass, setpersistence.persistentVolumeClaim.registry.storageClass,persistence.persistentVolumeClaim.chartmuseum.storageClassandpersistence.persistentVolumeClaim.jobservice.storageClass.If you use
StorageClass, for both default or specified one, setpersistence.persistentVolumeClaim.registry.accessMode,persistence.persistentVolumeClaim.chartmuseum.accessModeandpersistence.persistentVolumeClaim.jobservice.accessModeasReadWriteMany, and make sure that the persistent volumes must can be shared cross different nodes.You can also use the existing PVCs to store data, set
persistence.persistentVolumeClaim.registry.existingClaim,persistence.persistentVolumeClaim.chartmuseum.existingClaimandpersistence.persistentVolumeClaim.jobservice.existingClaim.If you have no PVCs that can be shared across nodes, you can use external object storage to store images and charts and store the job logs in database. Set the
persistence.imageChartStorage.typeto the value you want to use and fill the corresponding section and setjobservice.jobLoggertodatabase. -
Replica Set
portal.replicas,core.replicas,jobservice.replicas,registry.replicas,chartmuseum.replicas,notary.server.replicasandnotary.signer.replicaston(n>=2).
Installation
Install the Harbor helm chart with a release name my-release:
Helm 2:
helm install --name my-release harbor/Helm 3:
helm install my-release harbor/自定义安装
基于上一节官网提供的安装方法,实践。
自定义安装
创建命名空间
kubectl create ns harbor设为当前操作的默认命名空间
kubectl config set-context --current --namespace harbor添加repo
下载harbor的helm文件并解压查看
helm repo add harbor https://helm.goharbor.io
helm repo update
helm fetch harbor/harbor --untar
复制values.yaml,只保留需要修改(覆盖的内容)
cd harbor
cp values.yaml my-override-values.yaml

# 只修改并保留其中需要覆盖的内容
vim my-override-values.yaml
给大家看下我覆盖掉的内容
[root@jingmin-kube-archlinux harbor]# cat my-override-values.yaml
expose:
  ingress:
    hosts:
      core: harbor.ole12138.cn
      notary: notary.ole12138.cn
    controller: default
    ## Allow .Capabilities.KubeVersion.Version to be overridden while creating ingress
    kubeVersionOverride: ""
    className: "nginx"
    annotations:
      # note different ingress controllers may require a different ssl-redirect annotation
      # for Envoy, use ingress.kubernetes.io/force-ssl-redirect: "true" and remove the nginx lines below
      ingress.kubernetes.io/ssl-redirect: "true"
      ingress.kubernetes.io/proxy-body-size: "0"
      nginx.ingress.kubernetes.io/ssl-redirect: "true"
      nginx.ingress.kubernetes.io/proxy-body-size: "0"
    notary:
      # notary ingress-specific annotations
      annotations: {}
      # notary ingress-specific labels
      labels: {}
    harbor:
      # harbor ingress-specific annotations
      annotations: {}
      # harbor ingress-specific labels
      labels: {}

# The external URL for Harbor core service. It is used to
# 1) populate the docker/helm commands showed on portal
# 2) populate the token service URL returned to docker/notary client
#
# Format: protocol://domain[:port]. Usually:
# 1) if "expose.type" is "ingress", the "domain" should be
# the value of "expose.ingress.hosts.core"
# 2) if "expose.type" is "clusterIP", the "domain" should be
# the value of "expose.clusterIP.name"
# 3) if "expose.type" is "nodePort", the "domain" should be
# the IP address of k8s node
#
# If Harbor is deployed behind the proxy, set it as the URL of proxy
externalURL: https://harbor.ole12138.cn


# The persistence is enabled by default and a default StorageClass
# is needed in the k8s cluster to provision volumes dynamically.
# Specify another StorageClass in the "storageClass" or set "existingClaim"
# if you already have existing persistent volumes to use
#
# For storing images and charts, you can also use "azure", "gcs", "s3",
# "swift" or "oss". Set it in the "imageChartStorage" section
persistence:
  enabled: true
  # Setting it to "keep" to avoid removing PVCs during a helm delete
  # operation. Leaving it empty will delete PVCs after the chart deleted
  # (this does not apply for PVCs that are created for internal database
  # and redis components, i.e. they are never deleted automatically)
  resourcePolicy: "keep"
  persistentVolumeClaim:
    registry:
      # Use the existing PVC which must be created manually before bound,
      # and specify the "subPath" if the PVC is shared with other components
      existingClaim: ""
      # Specify the "storageClass" used to provision the volume. Or the default
      # StorageClass will be used (the default).
      # Set it to "-" to disable dynamic provisioning
      storageClass: ""
      subPath: ""
      #accessMode: ReadWriteOnce
      accessMode: ReadWriteMany
      size: 5Gi
      annotations: {}
    jobservice:
      jobLog:
        existingClaim: ""
        storageClass: ""
        subPath: ""
        #accessMode: ReadWriteOnce
        accessMode: ReadWriteMany
        size: 1Gi
        annotations: {}
    # If external database is used, the following settings for database will
    # be ignored
    database:
      existingClaim: ""
      storageClass: ""
      subPath: ""
      accessMode: ReadWriteOnce
      size: 1Gi
      annotations: {}
    # If external Redis is used, the following settings for Redis will
    # be ignored
    redis:
      existingClaim: ""
      storageClass: ""
      subPath: ""
      accessMode: ReadWriteOnce
      size: 1Gi
      annotations: {}
    trivy:
      existingClaim: ""
      storageClass: ""
      subPath: ""
      accessMode: ReadWriteOnce
      size: 5Gi
      annotations: {}
  # Define which storage backend is used for registry to store
  # images and charts. Refer to
  # https://github.com/docker/distribution/blob/master/docs/configuration.md#storage
  # for the detail.
  imageChartStorage:
    # Specify whether to disable `redirect` for images and chart storage, for
    # backends which not supported it (such as using minio for `s3` storage type), please disable
    # it. To disable redirects, simply set `disableredirect` to `true` instead.
    # Refer to
    # https://github.com/docker/distribution/blob/master/docs/configuration.md#redirect
    # for the detail.
    disableredirect: false
    # Specify the "caBundleSecretName" if the storage service uses a self-signed certificate.
    # The secret must contain keys named "ca.crt" which will be injected into the trust store
    # of registry's containers.
    # caBundleSecretName:

    # Specify the type of storage: "filesystem", "azure", "gcs", "s3", "swift",
    # "oss" and fill the information needed in the corresponding section. The type
    # must be "filesystem" if you want to use persistent volumes for registry
    type: filesystem
    filesystem:
      rootdirectory: /storage
      #maxthreads: 100

# debug, info, warning, error or fatal
logLevel: info

# The initial password of Harbor admin. Change it from portal after launching Harbor
# or give an existing secret for it
# key in secret is given via (default to HARBOR_ADMIN_PASSWORD)
# existingSecretAdminPassword:
existingSecretAdminPasswordKey: HARBOR_ADMIN_PASSWORD
harborAdminPassword: "Harbor12345"


# The secret key used for encryption. Must be a string of 16 chars.
secretKey: "not-a-secure-key"


database:
  # if external database is used, set "type" to "external"
  # and fill the connection information in "external" section
  type: internal
  internal:
    # The initial superuser password for internal database
    password: "w12345678"

redis:
  # if external Redis is used, set "type" to "external"
  # and fill the connection information in "external" section
  type: internal
这里的配置,使用ingress, className指定为nginx。
使用默认的存储类(这里没有指定,也可以手动指定下存储类名)。
这里指定Harbor默认管理账号admin的初始密码是Harbor12345。
使用内部的postgreSQL数据库,超级用户密码是w12345678。
使用内部的redis。
回到上级目录,
安装Harbor
cd ..
helm install harbor -f ./harbor/my-override-values.yaml ./harbor
看下ingress,有两个。
[root@jingmin-kube-archlinux harbor]# kubectl get ingress
NAME                    CLASS   HOSTS                ADDRESS         PORTS     AGE
harbor-ingress          nginx   harbor.ole12138.cn   192.168.1.100   80, 443   43m
harbor-ingress-notary   nginx   notary.ole12138.cn   192.168.1.100   80, 443   43m
访问下这两个地址,https://harbor.ole12138.cn是可以访通的,但是提示不安全,原因是默认使用的是自签的证书。
https://notary.ole12138.cn也是可以访通的,也是提示不安全,返回结果是未授权的json结果提示。
配置https证书
配置下tls证书,使用前面章节配好的cert-manager。
配置issuer
之前章节配过cert-manager,在当前命名空间下还是建一下staging和production环境的issuer (由Let’s Encrypt提供服务)
创建staging-issuer
wget https://raw.githubusercontent.com/cert-manager/website/master/content/docs/tutorials/acme/example/staging-issuer.yaml修改其中的邮箱部分,用于创建账号,以及将来有证书将要过期相关的内容会发到对应的邮箱
[root@jingmin-kube-archlinux issuer]# vim staging-issuer.yaml
[root@jingmin-kube-archlinux issuer]# cat staging-issuer.yaml
apiVersion: cert-manager.io/v1
kind: Issuer
metadata:
  name: letsencrypt-staging
spec:
  acme:
    # The ACME server URL
    server: https://acme-staging-v02.api.letsencrypt.org/directory
    # Email address used for ACME registration
    email: 784319947@qq.com
    # Name of a secret used to store the ACME account private key
    privateKeySecretRef:
      name: letsencrypt-staging
    # Enable the HTTP-01 challenge provider
    solvers:
      - http01:
          ingress:
            ingressClassName: nginx
部署staging-issuer
kubectl create -f ./staging-issuer.yaml 类似的方式,创建production-issuer
wget https://raw.githubusercontent.com/cert-manager/website/master/content/docs/tutorials/acme/example/production-issuer.yaml同样,修改其中的邮箱为自己的邮箱
[root@jingmin-kube-archlinux issuer]# vim production-issuer.yaml
[root@jingmin-kube-archlinux issuer]# cat production-issuer.yaml
apiVersion: cert-manager.io/v1
kind: Issuer
metadata:
  name: letsencrypt-prod
spec:
  acme:
    # The ACME server URL
    server: https://acme-v02.api.letsencrypt.org/directory
    # Email address used for ACME registration
    email: 784319947@qq.com
    # Name of a secret used to store the ACME account private key
    privateKeySecretRef:
      name: letsencrypt-prod
    # Enable the HTTP-01 challenge provider
    solvers:
      - http01:
          ingress:
            ingressClassName: nginx
部署到当前命名空间中
kubectl create -f ./production-issuer.yaml这两个issuer都通过http01的方式向Let’s Encrypt 发出challenge.
kubectl describe issuer可以看到description中都有一条Message: The ACME account was registered with the ACME server
为harbor-ingress的ingress配置证书
添加cert-manager的issuer注解cert-manager.io/issuer: letsencrypt-staging,
以及添加tls的hosts和secretsName部分(secretsName名称随便起,cert-manager会自动生成,这里已经有了,就不用改了)
[root@jingmin-kube-archlinux harbor]# kubectl edit ingress harbor-ingress
[root@jingmin-kube-archlinux harbor]# kubectl get ingress harbor-ingress -o yaml
apiVersion: networking.k8s.io/v1
kind: Ingress
metadata:
  annotations:
    cert-manager.io/issuer: letsencrypt-staging
    ingress.kubernetes.io/proxy-body-size: "0"
    ingress.kubernetes.io/ssl-redirect: "true"
    meta.helm.sh/release-name: harbor
    meta.helm.sh/release-namespace: harbor
    nginx.ingress.kubernetes.io/proxy-body-size: "0"
    nginx.ingress.kubernetes.io/ssl-redirect: "true"
  creationTimestamp: "2023-08-26T08:19:55Z"
  generation: 1
  labels:
    app: harbor
    app.kubernetes.io/managed-by: Helm
    chart: harbor
    heritage: Helm
    release: harbor
  name: harbor-ingress
  namespace: harbor
  resourceVersion: "945702"
  uid: 8d1e8f00-8f43-40c3-8b5d-06adad4305e6
spec:
  ingressClassName: nginx
  rules:
  - host: harbor.ole12138.cn
    http:
      paths:
      - backend:
          service:
            name: harbor-core
            port:
              number: 80
        path: /api/
        pathType: Prefix
      - backend:
          service:
            name: harbor-core
            port:
              number: 80
        path: /service/
        pathType: Prefix
      - backend:
          service:
            name: harbor-core
            port:
              number: 80
        path: /v2/
        pathType: Prefix
      - backend:
          service:
            name: harbor-core
            port:
              number: 80
        path: /chartrepo/
        pathType: Prefix
      - backend:
          service:
            name: harbor-core
            port:
              number: 80
        path: /c/
        pathType: Prefix
      - backend:
          service:
            name: harbor-portal
            port:
              number: 80
        path: /
        pathType: Prefix
  tls:
  - hosts:
    - harbor.ole12138.cn
    secretName: harbor-ingress
status:
  loadBalancer:
    ingress:
    - ip: 192.168.1.100
在浏览器中,使用https访问ingress地址https://harbor.ole12138.cn/, 会有提示警告,看下证书,以及颁发者(虽然还是提示无效,但不是k8s提供默认的fake证书,那就是Let’s Encrypt提供的staging证书)。
公用名 (CN)    (STAGING) Artificial Apricot R3
组织 (O)  (STAGING) Let's Encrypt
现在再修改一下ingress中annotations中的issuer,切换为production环境的issuer。注意其中一行: cert-manager.io/issuer: letsencrypt-prod
[root@jingmin-kube-archlinux harbor]# kubectl edit ingress harbor-ingress
ingress.networking.k8s.io/harbor-ingress edited
[root@jingmin-kube-archlinux harbor]# kubectl get ingress harbor-ingress -o yaml
apiVersion: networking.k8s.io/v1
kind: Ingress
metadata:
  annotations:
    cert-manager.io/issuer: letsencrypt-prod
    ingress.kubernetes.io/proxy-body-size: "0"
    ingress.kubernetes.io/ssl-redirect: "true"
    meta.helm.sh/release-name: harbor
    meta.helm.sh/release-namespace: harbor
    nginx.ingress.kubernetes.io/proxy-body-size: "0"
    nginx.ingress.kubernetes.io/ssl-redirect: "true"
  creationTimestamp: "2023-08-26T08:19:55Z"
  generation: 1
  labels:
    app: harbor
    app.kubernetes.io/managed-by: Helm
    chart: harbor
    heritage: Helm
    release: harbor
  name: harbor-ingress
  namespace: harbor
  resourceVersion: "946298"
  uid: 8d1e8f00-8f43-40c3-8b5d-06adad4305e6
spec:
  ingressClassName: nginx
  rules:
  - host: harbor.ole12138.cn
    http:
      paths:
      - backend:
          service:
            name: harbor-core
            port:
              number: 80
        path: /api/
        pathType: Prefix
      - backend:
          service:
            name: harbor-core
            port:
              number: 80
        path: /service/
        pathType: Prefix
      - backend:
          service:
            name: harbor-core
            port:
              number: 80
        path: /v2/
        pathType: Prefix
      - backend:
          service:
            name: harbor-core
            port:
              number: 80
        path: /chartrepo/
        pathType: Prefix
      - backend:
          service:
            name: harbor-core
            port:
              number: 80
        path: /c/
        pathType: Prefix
      - backend:
          service:
            name: harbor-portal
            port:
              number: 80
        path: /
        pathType: Prefix
  tls:
  - hosts:
    - harbor.ole12138.cn
    secretName: harbor-ingress
status:
  loadBalancer:
    ingress:
    - ip: 192.168.1.100
再次在浏览器中,以https方式,访问nacos的ingress地址https://harbor.ole12138.cn/. 正常的话,可以直接访通,没有任何警告。 看下地址栏前面的锁头标志,点看看下证书,确认是Let’s Encrypt颁发的。
为harbor-ingress-notary的ingress配置证书
添加cert-manager的issuer注解cert-manager.io/issuer: letsencrypt-staging,
以及添加tls的hosts和secretsName部分(secretsName名称随便起,cert-manager会自动生成,这里的secretsName和上一个ingress的重名了,所以改了个名字,改为harbor-ingress-notary)
[root@jingmin-kube-archlinux harbor]# kubectl edit ingress harbor-ingress-notary
[root@jingmin-kube-archlinux harbor]# kubectl get ingress harbor-ingress-notary -o yaml
apiVersion: networking.k8s.io/v1
kind: Ingress
metadata:
  annotations:
    cert-manager.io/issuer: letsencrypt-staging
    ingress.kubernetes.io/proxy-body-size: "0"
    ingress.kubernetes.io/ssl-redirect: "true"
    meta.helm.sh/release-name: harbor
    meta.helm.sh/release-namespace: harbor
    nginx.ingress.kubernetes.io/proxy-body-size: "0"
    nginx.ingress.kubernetes.io/ssl-redirect: "true"
  creationTimestamp: "2023-08-26T08:19:55Z"
  generation: 2
  labels:
    app: harbor
    app.kubernetes.io/managed-by: Helm
    chart: harbor
    heritage: Helm
    release: harbor
  name: harbor-ingress-notary
  namespace: harbor
  resourceVersion: "949949"
  uid: e2375480-bbe2-4517-94d3-f3002832d1e4
spec:
  ingressClassName: nginx
  rules:
  - host: notary.ole12138.cn
    http:
      paths:
      - backend:
          service:
            name: harbor-notary-server
            port:
              number: 4443
        path: /
        pathType: Prefix
  tls:
  - hosts:
    - notary.ole12138.cn
    secretName: harbor-ingress-notary
status:
  loadBalancer:
    ingress:
    - ip: 192.168.1.100
在浏览器中,使用https访问ingress地址https://notary.ole12138.cn/, 会有提示警告,看下证书,以及颁发者(虽然还是提示无效,但不是k8s提供默认的fake证书,那就是Let’s Encrypt提供的staging证书)。
公用名 (CN)    (STAGING) Artificial Apricot R3
组织 (O)  (STAGING) Let's Encrypt
现在再修改一下ingress中annotations中的issuer,切换为production环境的issuer。注意其中一行: cert-manager.io/issuer: letsencrypt-prod
[root@jingmin-kube-archlinux harbor]# kubectl edit ingress harbor-ingress-notary
[root@jingmin-kube-archlinux harbor]# kubectl get ingress harbor-ingress-notary -o yaml
apiVersion: networking.k8s.io/v1
kind: Ingress
metadata:
  annotations:
    cert-manager.io/issuer: letsencrypt-prod
    ingress.kubernetes.io/proxy-body-size: "0"
    ingress.kubernetes.io/ssl-redirect: "true"
    meta.helm.sh/release-name: harbor
    meta.helm.sh/release-namespace: harbor
    nginx.ingress.kubernetes.io/proxy-body-size: "0"
    nginx.ingress.kubernetes.io/ssl-redirect: "true"
  creationTimestamp: "2023-08-26T08:19:55Z"
  generation: 2
  labels:
    app: harbor
    app.kubernetes.io/managed-by: Helm
    chart: harbor
    heritage: Helm
    release: harbor
  name: harbor-ingress-notary
  namespace: harbor
  resourceVersion: "950802"
  uid: e2375480-bbe2-4517-94d3-f3002832d1e4
spec:
  ingressClassName: nginx
  rules:
  - host: notary.ole12138.cn
    http:
      paths:
      - backend:
          service:
            name: harbor-notary-server
            port:
              number: 4443
        path: /
        pathType: Prefix
  tls:
  - hosts:
    - notary.ole12138.cn
    secretName: harbor-ingress-notary
status:
  loadBalancer:
    ingress:
    - ip: 192.168.1.100
再次在浏览器中,以https方式,访问nacos的ingress地址https://notary.ole12138.cn/. 正常的话,可以直接访通,没有任何警告。 看下地址栏前面的锁头标志,点看看下证书,确认是Let’s Encrypt颁发的。
发表回复